Introduction


Thanks for visiting my page. To help with navigation, here is a list of popular pages all about Marching in Colour

* The History of Marching In Colour - who is the man behind the words and service, how did it all come about

* Commissioning Models for Painting - how the process works, start to finish, and what you can expect

* Gallery of Artists Work - with over 20 years experience, here is a small sample of finished commissions

* ITEMS FOR SALE - as well as painting models, I also sell pre-painted models and assorted loose models and scenery on Etsy and Ebay. Links here!

* Trade in your old models for Painting Credit * click here for details

* To see details of all current commissions booked-in and estimated completion dates - click here

SCENERY and TERRAIN - for pre-made, handcrafted items of scenery and terrain, please click here

For TUTORIALS please follow this link - click here


Thursday 9 September 2010

Battle Report / Game Review - Critical Mass Games

I recently attended the Border Reiver show in Newcastle (which was a good show, very poor lighting but a great atmosphere!), where one of the display games that took my interest was a 15mm sci-fi game by Critical Mass Games.

Now Im a fan of sci-fi movies and video games but Ive never been a fan of sci-fi wargames. All the ones Ive played over the years always leaving me feeling more than a little disappointed. I am not a fan of 'line em up, knock em down' bloodbaths!

Still the models looked great (especially the human 'Arc' - the Halo style infantry and the truly amazing walkers), and following a quick conversation with the guy on the trade stand I learnt that the rules are (or where?) available as a free beta pdf.

So a couple of days later I emailed Critical Mass Games, and a couple of days after that we sat down to give the game a try!

Three points I should mention first -
1) We decided as this was the first play to ignore some rules and concentrate mainly on the moving/shooting/combat mechanics.
2) It reads as a 1v1 game, but there were 3 of us available and ready to play (a rarity!), so we decided to play 1v1v1.
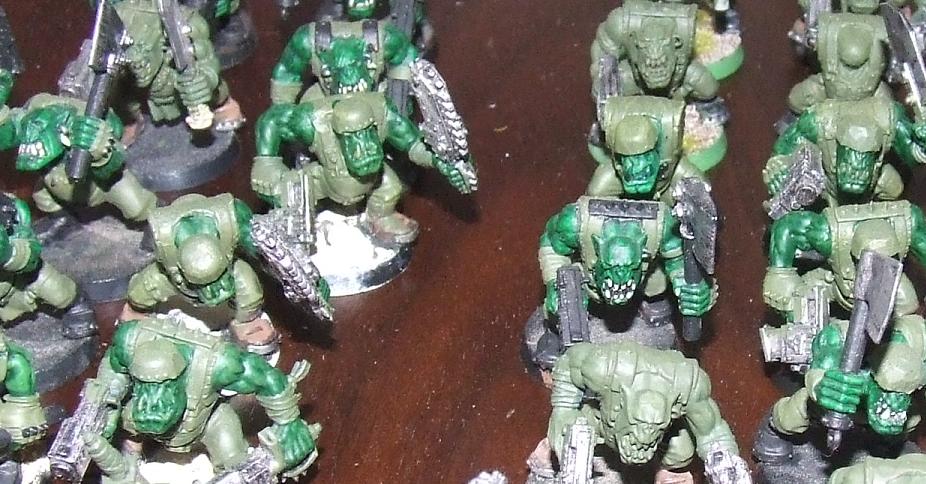
3) The game is 15mm but as we had no 15mm sci-fi but plenty of 6mm Epic we used proxy miniatures.

The forces -
I am nothing if a sucker for playing humans so I choose 'Arc' - mech infantry with a sole tank in support.
Lee - choose 'Protolene' an elite alien race, going mainly armour/range, with 4 battlesuits and heavy weapon infantry.
Karl -also 'Protolene' but choosing fast attack, close assault troops.

The Objective -
2 buildings, centre left on the table. Control of each building being worth 1vp meaning 3 players - 2 objectives, at least 1 of us is going home in defeat!

The Set up and Initial Plans


I took the bottom, my mech infantry planning on a quick advance to the objectives, deploying and securing the location, while the tank roamed and picked off dangerous looking targets.
Lee took centre, a tough place sandwiched between me and Karl. His initial plan to move one unit of infantry up, with his armoured walkers in close support, covered all the way by the heavy weapon infantry.
Karl, knowing his units close combat potential, intended to edge his way to the objectives, avoiding enemy fire until his troops where close enough to devastate in hand to hand.

Turn 1

Lee moves the majority of his force to the left of the terrain blocking his direct advance to the objectives. My vehicles, having less armour in the side and rear were now unable to make a dash for the objective, so they had to square up to the Protene. Karl begins a caution approach to the objectives.

Turn 2

My mech inf got the better of Lee's infantry, so he issued new orders for them to pull out of the fire fight and head for the building. His impressive battle suits edging forward to engage my units and cover his infantry.
Faced with something more of a threat than a bunch of aliens with pop-guns (now a bunch of big fat aliens with pop-guns!) I decided to withdraw the mech infantry and deploy into firing positions - the gap being large enough to bring out my missile launchers to see off the battlesuits, all the time covered by the tank.
Karl unopposed, continued his advance to the objectives, making sure to hug the edge of the board and keep out of the range of Lee's heavy infantry, which had a commanding and unrestricted LOS through the middle of the board.


Turn 3

Lee's chewed up unit made it into one of the objective buildings, Karls combat troops claiming the other.
The trouble Karl had was this advance now put him within range of Lee's heavy infantry and they began to pepper the building with shots. This didnt help the Judge Dread style block war that was starting to erupt as infantry from both buildings began shooting at each other.

***FOOT NOTE*** - The rules are still in beta and whilst there are rules for fighting in/out/around buildings they seem mainly to cover single level constructs. We had to make a few rules up on the spot to help us out here, but that was easily done. Maybe we will see more rules for buildings in the finished version of the game.

Meanwhile my combined firepower was having disastrous results for Lee. Now that the troops had deployed, and readied the missile launchers, the Protolene battlesuits where forced to withdraw and seek cover.

Turn 4

Under fire form the heavy infantry Karl had no choice but to act. The troops in the first building made a head strong charge into the second building occupied by Lee's infantry, whilst the cream of his close combat effect and his general headed straight for a do-or-die charge against Lees heavy infantry shooting the building.
It was a route for Lee's already battered forces, and he lost every engagement. Faring no better against my Arc infantry, APC's and tank - losing all his remaining battlesuits, including his general, whilst being unable to even wound a single Arc unit!

Lee having suffered terribly surrendered, and Karl had to question if his depleted force was capable of taking on my untouched Arc force. As this was our first game just to learn the basic rules we decided to call an end to it there. (Assuming my Arc troops just moved in and moped up! Sry guys, couldnt resist adding this!)

Afterthoughts
We were all taken with the game, and had a great time!
These are beta rules and this our first attempt and while we did ignore some rules, and we were bound to make a few mistakes with the ones we did play, generally it works very well.
There are several patchy areas and a few things that seem odd, or seem would play better with a little adjusting, but I find that with most games.
As a beta tester I will be submitting my feedback to Critical Mass, in the hope that some suggestions make it, if not I will definitely be playing this game again, maybe with a few house rules added.

As for scale, it played very well in 6mm, more than I feel it would in 15mm. The movement and ranges seem to suit a 6mm 'battle' more than a 15mm large skirmish. It was suggested between us that we play up to and around 1500pts in 15mm and larger games in 6mm.
This game was roughly 500pts, with my Arc troops coming in at 465pts, having nothing to spend the remaining pts on.

All in all, a fast, much liked game, and I look forward to playing again once we learn the rest of the rules.

Chris

Critical Mass Games can be found at -
http://www.criticalmassgames.com/

Check out the Arc walkers - superb!

Tuesday 3 August 2010

Perry Miniatures - ACW

I have been a fan of the Perry brothers work for many years now and was intrigued with the new plastic models that have arrived on the wargames scene, so I decided to get a box and see what they where like to paint up.

This blog focuses entirely on the ACW Infantry boxset, available from stockists, with an rrp of 15.00.


Here in the UK I bought this set from www.empiregamestore.co.uk for 13.50 (10% discount) and free postage.

Initial Thoughts
Plastic is very easy to work with, and this box set is no exception. A few cuts here and there and a bit of scraping - all done with a sharp knife - and the majority of the models are ready to go.
There is a little assembly required, you get the option of standard bearer and musician, as well as a few models with different arm combinations, but mainly the choice is head wear - all the models need either a forage cap or a slouch hat added.

The Painting Plan
The price of these boxsets is remarkable value for 36 models, especially in 28mm, so this lead me to the idea that one could assemble a pretty large force, quickly and easily. I therefor wanted to get this regiment up and painted as quickly as possible. No 'Golden Demon' entry but a fast and attractive good wargames standard - aiming for mass effect over individual perfection.

The aim is for a unit of models that look good together.

Base Coats
As most people know there is a split camp between which is best as an undercoat - black or white.
I have been painting for many years and understand why a base coat is necessary, but I favour a colour that is closer to something I am going to be working with. That is why for these models I gave them an undercoat of Vallejo: Stormy Blue. This is a nice thick, strong colour, and means you can skip an undercoat and simply use it as a base coat.


I painted all the upper body of the models in Stormy Blue, then all the lower model in Games Workshop: Enchanted Blue.

The trousers where then given a coat of Vallejo: Electric Blue, leaving a little Enchanted Blue showing in the groves. The jackets where left with the base coat/undercoat. The idea being that using a flat colour as an undercoat the paint naturally dries a deeper colour in the grooves, and slightly lighter on the top surfaces, adding a depth of shade with no further work required.


Trappings and Flesh tone
From the artwork on the box and a little research I found that most of the models equipment was either black, or dark brown. So very little work was needed here.


For flesh I hate the 'pink' look on a lot of models. People aren't pink. I started with a base coat of Vallejo: Dwarf Skin, then a wash of Games Workshop: Flesh Wash. The highlights where picked out with Vallejo: Bronze Flesh tone.


Repeat this process and then a few hours later - voila!


Please click on on any of these photos for a larger image.


Summary
On the whole I am pleased with these models and with the box set itself. The models are well sculpted and paint up easy to a good result.

I am a professional artist and will be selling these regiments, fully painted and based, to the quality shown in the photographs. This deal includes 36x 28mm Perry Miniatures comprising of 3 Officers, 1 Standard Bearer, 1 Musician and 31 troopers. Fully based to your specifications on textured, detailed bases, and free worldwide postage.

All for 92.00GBP (150USD, 110E), that's just over 2.50 for a fully painted and based 28mm model, delivered to your door.

Dispatch time is 7-14 days from receipt of payment.
Please contact me to discuss an order, or for further details.

Also available for other commission work

Thanks
Chris

E-mail: Project_Vehemence@yahoo.co.uk

Monday 26 July 2010

Daemonette - Games Workshop

Here is a model a painted a couple of years back, just because I liked the look of her/it?


Its something of a showpiece for me, and took a good few hours work. Mainly painted with GW paints, thined down. The markings on the head and outer thigh were done using a VERY thin brush!

Hope you like it

Thanks
Chris

More 6mm WW2 British

Heres a few photos of a recent commission I took for World War 2 British Infantry. Models are all Adler Miniatures and are overall very well sculpted and cast.

Firstly a mortar team.


Various Infantry and Engineers.


Vickers machine gun.


And finally a Bren gun.


Thanks!
Chris

Thursday 15 July 2010

Naval Battle Report 1 - (1804, Battle of Cape Santa Maria)

Action of 5th October 1804
The Battle of Cape Santa Maria

Rule set: Trafalgar (Warhammer Historical)

Players: Chris (Britain)
Lee (Spain)

Intro

Aside from a regular Saturday night group, my friends and I haven't done much gaming lately, so finding that both myself and my good friend Lee 'Skirmish Phalanx' where available we decided to meet up and have a light game of Trafalgar.

Being a sucker for 'history' over 'points values', I persuaded Lee to re-fight a real naval engagement, and to try and keep it as level as possible I choose the Battle of Cape Santa Maria, as it had 4 ships per side, and in game terms (points values) this meant a balanced game. Having only 4 ships each also suited the time we had available and our mutual desire for a quick, easy game.

History
You can find a good article on the battle on Wikipedia (link at the bottom), but the brief is as follows-

The British have learn t of a Spanish Fleet carrying vast amounts of treasure. They know the rough location of this fleet and have position a squadron to intercept.
Britain and Spain are not at war, however it is believed that Spain will soon declare, so the British Commodore was sent orders to intercept the treasure ships, peacefully if possible....

The Order of Battle

SPAIN
Medea (40), Flagship, commanded by Capitán Francisco de Piedrola y Verdugo
Fama (34), Capitán Miguel Zapiain y Valladares
Mercedes (36), Capitán Jose Manuel De Goicoa y Labart
Santa Clara (34), Capitán Aleson y Bueno

BRITIAN
HMS Indefatigable (44), Commodore Graham Moore
HMS Lively (38), Captain Sir Graham Eden Hamond
HMS Amphion (32), Captain Samuel Sutton
HMS Medusa (32), Captain John Gore


THE BATTLE

TURN 1
The two forces spot each other, the British Navy heads straight to the Spanish, sending a signal to stand to and prepare to be boarded. The Spanish naturally decline the offer....


TURN 2
A sudden change in the wind leaves the Spanish Flagship the Medea clambering to fix sail. In a panic the Spanish sailors make a mess of things, and the Medea drifts to a halt while the rest of the fleet pass her by. The British seeing the flagging Medea make a bee line straight for the distressed vessel.

TURN 3
Still unable to fix sail the Medea chooses to drop anchor and await the British fleet, the first to arrive is the HMS Indefatigable and the two flagships exchange broadsides. The Inde coming off with damage to her rudder, but the Medea is set on fire!
HMS Lively, Amphibian and Medusa all combine to give the Spanish Fama a good licking, who sees her Foremast taken down. The Fama and the Mercedes return fire at the British ships, the Spanish gunnery proving most ineffective with only minor damage to the British.


TURN 4
The British sail past the Spanish and all arrive within shooting range of the flagship Medea, the damaged Indefatigable managing to drop sail enough to remaining within broadside range.
The combined fleet action is enough to see the Medea strike her colours, it doesn't look good for the Spanish! But what is this!? HMS Amphibian is spotted straggling behind the convoy, and still within range of the Spanish guns!


Santa Clara and Mercedes find themselves with the opportunity to unleash raking broadsides down the Amphibian and the Fama assists with cannon to the side. The combined assault, even at range, is enough to put the Amphibian out of action, and she strikes.

One all.


TURN 5
The Indefatigable managers to repair her rudder, and with the Medusa following makes a tight circle back round to the Spanish line, the Livery is forced to go wide due to avoiding the Medea and finds itself a little way off from the main pair.
The Spanish way the cost of losing the Medea against the knocking out of the Amphibian, and decide to attempt to cut off the Livery from its sister ships.


TURN 6
The Fama and Mercedes head off to intercept the Livery, whilst the Santa Maria blocks its route to the Inde. All ships exchange fire, except the Indefatigable who has out-sailed her companions. With the Inde unable to bring her guns to bare, the Spanish have the better of it. The Liverly holds up well against the Spaniards, but the toll of being out gunned with the Indefatigable unable to find a target, takes its toll on the British.


TURN 7
The Indefatigable and the Medusa prepare to turn back onto the Spanish, but a sudden change in wind forces them to a virtual stand still. Meanwhile the Livery finds herself continuing to fight two ships, as the Santa Clara takes the place of the leaving Fama. The combined broadsides inflict some serious damage on the Livery.


TURN 8
Having just prepared to turn, taken into account the change of wind, the Indefatigable and the Medusa curse their luck as the wind changes back to its original course! This leaves both ships dead in the water, as sailors clamber back and forth constantly trying to control the sails. The Livery, though badly damaged, breaks through the gaps left by the Spanish ships, but given the loss of the Amphibian and the damage to the Livery, the British decided to call it a day. The Spanish survive the assault. The gold is safe.

AFTERMATH
Alas! History did not repeat itself for the British this time around. In real life the British won, destroying the Mercedes and capturing the other 3 Spanish vessels, with next to no loss to themselves.

The game ended much as it started - what proved unlucky for the Spanish, the initial wind, and poor rolls by the Medea to recover, ended the Indefatigable and the Medusa's attempts to re-enter the fray, and whilst the British have the edge over the Spanish on gunnery, it was a lot to ask of the Livery to face two equal sized Spanish ships.

All in all a good couple of hours play!

I hope you enjoyed this battle report and I would love to hear your feedback, opinions and comments. If you have any questions on the battle on the rule set used, I will do my best to answer them.

More reports to follow!

Thanks
Chris
(and Lee)

Wiki page - http://en.wikipedia.org/wiki/Action_of_5_October_1804

Tuesday 13 July 2010

WW2 - British Infantry (6mm)

Heres a little 'sneak peak' of a painting commission for 6mm World War 2 British Infantry. The pic is currently awaiting client approval (I paint a sample then email the photo to the client), before I start the main army.

These are 6mm models from Adler Miniatures.

The bottom of the photo is the models close to actual size.
The top half is blown up approx 150%.

As always - comments and feedback really appreciated!

Thanks
Chris

VIETNORK - Part 2: Troop choice, Uniform Guide, Ork Flesh


1000pts - bang on!
Flicking through the rulebook I managed to sort the models out into a reasonable straight 1000pts. Sticking with the Vietnam theme I wanted to make this as much about infantry as possible, so this "Plar'tun" consists of 3 Rifle sections (15men, including heavy weapon and Nob), a 5-ork burner team, and my first effort on 'Air Kavalry' with a squad of Stormboyz (Jump pack Infantry).

I may be tempted to buy some Defkoptas for this army, but as its already 1000pts and in the end I want to sell this, I really want to avoid spending money on it. But I suppose as the bikes are just in the list to make up the points, these could be removed and koptas added.

The UNIFORM


I tend to mainly use Vallejo paints these days so all the models received a base coat of 72067- Caymen Green, before being dry brushed with 72031- Camoflage Green.

Vallejo paints are hard to dry-brush with as they are very thin, giving the paint a good shake, and cleaning the brush several times of paint before the actual dry-brush seems to work best.

The only change to the models at this point is to the helmets. All spikes and furs, skulls etc have been removed and all helmets trimmed to create a standard 'round' GI helmet.


ORK FLESH


Once the uniform base coat and dry-brushing was complete I added a base layer of 72028 - Dark Green to all flesh areas on the models.

The muscles were then painted with a smudging of 72030 - Goblin Green. This was applied unevenly - thickly on some parts and on some models, and almost dry brushed onto others. The idea being that I didnt want all the Orks to be identical. The way I see Orks is varying shades of green! I always think the older, more grizzly the Ork, the darker more hagged his skin.


All the skin was then given a wash of Dark Green ink. With the somewhat erratic Goblin Green coat, now blending perfectly to create to finished skin tone. As you can imagine the differing layers/thickness of the Goblin Green on the other models gives a good mix of Ork ages.

The final photo is enlarged to show the effects of a simple dry-brushing over a base coat, as well as the finished skin.


Part 3 to follow soon - thanks for reading!

Feedback always appreciated.

Chris

Monday 12 July 2010

Project - VIETNORK


I was having a rummage the other day, like all gamers do, through my odds and sodds, and boxes of long forgotten models, when I came across a box of 40k Orks. Now 40k is not my cup-of-tea and I only came to own these models after helping a friend out by lending him some money... long story short, 'neither a lender or a borrower be', when my friend was having trouble paying back the money he said "Do you want my 40k Ork army instead??"

I should have said "No", but what is a friend to do? I said "Sure, no problem..." and so they have sat in a box for the last umpteen years, alone, unused and forgotten.

Until the other day.

Im not a 40k player, but I fancied a change from painting historicals, and so I thought I would try something a little different with this army and mix two periods - 40k, and the Vietnam War!

The idea of Vietnork was born!

Over the course of the next few weeks I will be adding to this army, painting sections at a time, and posting the report here as well as on my facebook page, charting my progress and hopefully giving you hints and tips on how to paint 40k Orks.

At the end of this project the Army will be for sale. I am open to offers as we progress, or will list it on Ebay once its complete.

More blogs to come real soon on this project, or for now you can head over to my facebook page (http://www.facebook.com/profile.php?id=1275313348) for sneak peeks at more photos.

Thanks
Chris

Welcome to Marching in Colour

Hi, and thanks for taking the time to check out my blog.
I am an artist, working full time, who specialises in 'toy soldiers'.
This blogspot will be used to showcase my work, keep clients upto date on current orders, and to generate new commissions.

If you are interested in having any models painted, need a character for RPG, or fancy starting a new period and want a complete ready made army, please get in touch - Im the man who can help you out!

My rates are reasonable, and I offer several perks such as guaranteed completion dates, loyalty bonuses, and a free magazines (Wargames Illustrated or White Dwarf) for all orders over £150.

Contacting me is easy - just post here, email me at Project_Vehemence@yahoo.co.uk, or visit my Facebook page at http://www.facebook.com/profile.php?id=1275313348